Installing the BeOS Preview Release
Because you'll need to refer to this document while installing the BeOS, you'll probably find it easiest to use if you print it. Look for the latest version of this document at the Preview Release Support section on the Be web site:
Installation Requirements
You can run the BeOS on a "Rev 6" or later BeBox Dual603 personal computer that has at least 16 MB of RAM.
If you're planning to run the BeOS on a Power Macintosh, you will also need:
Note that if you have a one-button mouse, you can emulate a three-button mouse by pressing Control-Command while you click the mouse button to emulate the secondary mouse button, and by pressing Control-Option while you click to emulate the tertiary mouse button.
Important: This list of BeOS-ready hardware is provided for informational purposes only. Support for any particular hardware platform may change without notice. Be cannot be held responsible for the use of this information, or the appropriateness of any purchase decision based on this information.
http://www.be.com/support/preview/index.html
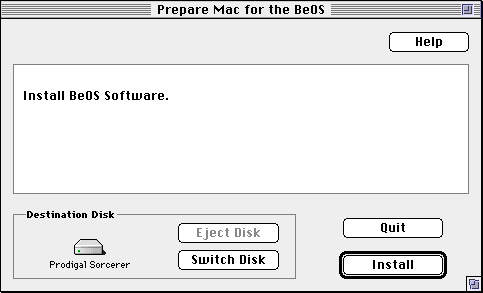
Click Continue if you're asked if it's OK to quit other applications. When the installation is complete, click Quit.
This script installs a folder named BeOS Mac Tools on the Mac hard disk. It also installs a system extension file named OS Chooser (in the Extensions folder in the System folder), which lets you choose whether you want to start the BeOS or the Mac OS each time you start the Macintosh.
Note: If you're planning to create a partition for the BeOS, rather than installing the BeOS onto an entire disk, follow the instructions in "Advanced Installation Option: Creating a Hard Disk Partition for the BeOS For Mac OS Systems," later in this chapter. When you've created the BeOS partition, continue with these instructions.
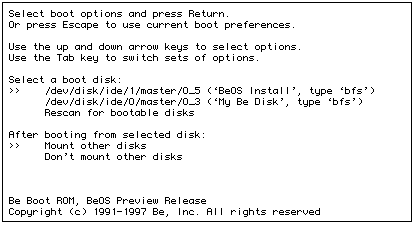
Each bootable disk is listed by its device name and by the name it has in the Tracker. The BeOS Install CD-ROM is listed as "(`BeOS Install', type `bfs')."
If the BeOS Install CD-ROM doesn't appear in the list, it's because the CD-ROM drive hasn't "spun up" and become ready yet. If this happens, use the arrow keys to select "Rescan for bootable disks" and press Return. You may need to do this a couple times if your CD-ROM drive takes a long time to spin up.
After a moment, the BeOS License Agreement panel opens.
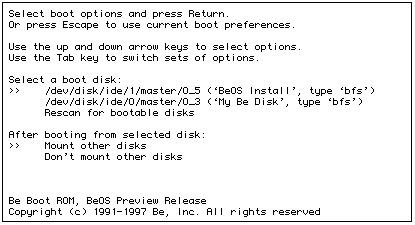
Each bootable disk is listed by its device name as well as by the name it has in the Tracker. The BeOS Install CD-ROM is listed as "(`BeOS Install', type `bfs')."
If the BeOS Install CD-ROM doesn't appear in the list, it's because the CD-ROM drive hasn't "spun up" and become ready yet. If this happens, use the arrow keys to select "Rescan for bootable disks" and press Return. You may need to do this a couple of times if your CD-ROM drive takes a long time to spin up.
After a moment, the BeOS License Agreement panel opens.
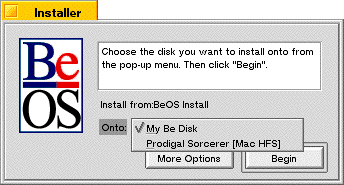
The Onto pop-up menu contains a list of hard disk drives connected to the computer. If a disk is divided into multiple partitions, each partition appears in this menu as a separate choice.
Caution: Every drive and drive partition on your computer appears in this list, including your Mac OS or DR8 partitions, if you have any. Non-BeOS volumes are noted with a volume type (e.g., "[Mac HFS]") in the pop-up menu.
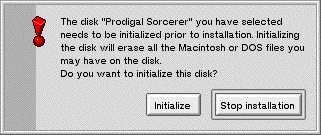
This dialog could mean that you have chosen an uninitialized partition, such as a newly created partition. In this case, the volume is empty, and it is OK to initialize it.
This dialog could also mean you have chosen a Mac OS or old BeOS partition. Be careful to select an empty or expendable partition.
If you click the Initialize button, the BeOS installs onto the volume after it is completely erased and a BeOS file system is created on it. Before this happens, you are asked to confirm the initialization and choose a volume name in step 3.
If you click the Stop installation button, the installation is cancelled, and the Installer's main screen reappears.
If the volume you have selected already has the BeOS installed on it, you're asked if you wish to replace existing files with files from the installation, or if you wish to keep your older files:
If you click the Keep button, the existing (and possibly obsolete) file will not be replaced. This dialog appears for every file which already exists on the installation volume.
If you click the Replace button, the file is replaced. This dialog appears for every file which already exists on the installation volume.
If you click the Replace All Older button, the file is replaced, and the Installer automatically replaces all remaining older files with fresh copies from the BeOS Install CD. This is the recommended selection.
If you have selected a BeOS file system volume, you're asked if you wish to initialize the volume before installing the BeOS:
If you click the Initialize button, the BeOS installs onto the volume after it is completely erased. Before this happens, you're asked to confirm the initialization and choose a volume name in step 3.
If you click the Install as is button, the BeOS installs onto the volume without erasing anything first. Note, however, that even if you choose this option the installation process may replace files which already exist on the volume, such as the operating system files. Skip to step 4.
If you click the Stop installation button, the installation is cancelled, and the Installer's main screen reappears.
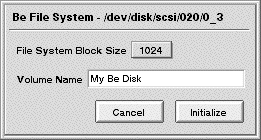
You can also set the file system block size, but unless you have a specific reason for doing so, you should not change this setting from the default of 1024.
Select the default volume name and replace it with a name for your BeOS volume, if you wish. Click the Initialize button. You're asked to confirm the initialization:
Click Initialize. The drive will be initialized (this takes a few seconds).
If you click the Stop button, you're asked if you really wish to halt the installation:
Stopping the installation is not recommended. If the Installer has removed outdated system files but not yet replaced them, your BeOS volume may not have all of the operating system files on it which are necessary to boot the BeOS from that disk. If you halt the installation process before completion, you should run a complete installation later, before you attempt to boot the BeOS from this volume.
If you have a Macintosh, the OS Chooser dialog box appears, shortly after you first see the message, "Welcome to Mac OS." You can use OS Chooser to select the OS you want to boot, the BeOS or the Mac OS, as described in Chapter 2, "Learning BeOS Basics."
Be sure you have backups of your important files if you choose this option!
To start the BeOS on a Power Macintosh, start the Mac OS and then double-click the BeOS Launcher application, which is in the BeOS Mac Tools folder you installed on the Macintosh hard disk.
To learn more about using the BeOS, see Chapter 2, "Learning BeOS Basics."
Advanced Installation Option: Creating a Hard Disk Partition
It is sometimes advantageous or necessary to create a separate partition to install the BeOS. What you need to know to do this is summarized in the following list:
for the BeOS For Mac OS Systems
Warning: Partitioning your hard drive can destroy all data on that drive. Be sure you have adequate backups of all your important data before you begin any procedure in this section.
Note: If you have a BeBox, instructions for using DriveSetup to partition your hard drive can be found in Chapter 6 "Customizing the BeOS."
You can also defragment your hard drive by backing up the entire drive, erasing all the data, and then restoring your data from the backup. We recommend Norton Speed Disk.
WARNING: Once again, modifying hard disk partitions can destroy all data on the hard drive. Do not proceed unless you have a complete backup of your hard disk!
Your formatting utility may be on the Mac OS installer CD-ROM. You can also put the formatting utility onto a floppy disk, second hard drive, Zip or Jaz drive (or other cartridge drives) and use it from there.
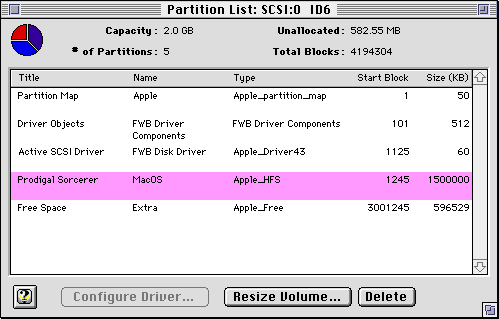
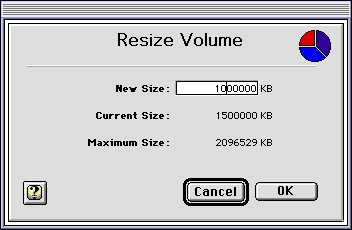
In Hard Disk Toolkit, simply click the Resize Volume button, then choose a new (smaller) size for the existing volume (in this case, 500,000K or less):
You may have to confirm the resize command, possibly several times. If you are sure you wish to proceed, confirm everything.
Your existing hard drive partition will be shrunk.
WARNING: This step may destroy all data on your existing Mac OS partition. Be sure you have consulted your software manual, and carefully read the alert dialogs that appear. Also be sure that this is what you want to do.
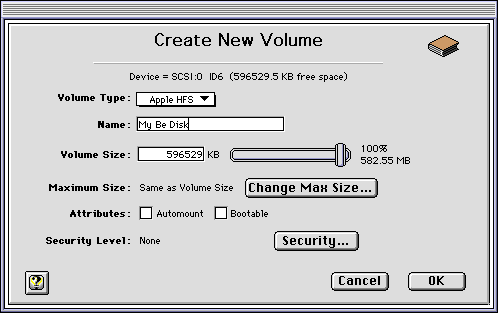
You can choose the size for the new partition (some software makes this easier than others). Most likely you'll want to make it the same size as the amount of space you shrunk the Mac OS partition.
Be sure to choose to create an Apple_HFS-type volume. You may also be able to name your volume at this point. If so, name it "My Be Disk," or any name that makes it easy to remember when you install the BeOS on it later.
After clicking "OK" or "Confirm" to any confirmation dialogs, the hard drive partitioning utility creates a new partition on your hard drive (this can take a few minutes). When it completes, you should receive some kind of confirmation message.