[Contents] [Prev] [Next] [Index]
1
Installing the BeOS Preview Release
This chapter tells you how to install the BeOS for Power Macintosh and BeBox computers. It contains the following information:
Because you'll need to refer to this document while installing the BeOS, you'll probably find it easiest to use if you print it. Look for the latest version of this document at the Preview Release Support section on the Be web site:
http://www.be.com/support/preview/index.html
Installation Requirements
You can run the BeOS on a "Rev 6" or later BeBox Dual603 personal computer that has at least 16 MB of RAM.
You can also run the BeOS on many models of Power Macintosh or compatible computers that are based on the PowerPC 603 or 604 microprocessor and a PCI bus. This includes single and multiple-processor systems from Power Computing, UMAX, Motorola, Apple, DayStar, SuperMac, and other manufacturers. Check the Be web site for a list of specific brands and models:
http://www.be.com/products/beosreadylist.html
If you're planning to run the BeOS on a Power Macintosh, you will also need:
- At least 16 MB of RAM.
- An extended Apple Desktop Bus (ADB) keyboard.
Though you can work with smaller keyboards, you'll find that some tasks in the BeOS are easier with an extended PC-style keyboard (with function keys and an Escape key).
- A standard ADB mouse.
You can do almost everything in the BeOS with a one-button mouse, but there are lots of shortcuts that are easier if you have a mouse with two or three buttons. You can use any multiple-button mouse that conforms to the Apple guidelines for multiple-button mice (we've tested multiple-button mice from Kensington).
Note that if you have a one-button mouse, you can emulate a three-button mouse by pressing Control-Command while you click the mouse button to emulate the secondary mouse button, and by pressing Control-Option while you click to emulate the tertiary mouse button.
- A 150 MB or larger hard disk or partition.
It's easiest to install the BeOS on a hard disk you use only for the BeOS, but if you're comfortable working with a hard disk formatting utility, you can create a partition on a BeBox or Mac OS disk and install the BeOS on it, so you don't need two disks. See the "Advanced Installation Option: Creating a Hard Disk Partition for the BeOS For Mac OS Systems" section later in this chapter.
- A CD-ROM drive.
You can use virtually any model of CD-ROM drive to install the BeOS. However, to take advantage of some of the advanced features of the CDPlayer application, you need a Toshiba model 3401, 3601, or 3701 SCSI CD-ROM drive.
- You can use the Macintosh's on-board Ethernet connector or a DEC 21040- or 21041-based PCI network adapter card to connect to an Ethernet network.
- You can use any of a wide variety of high-speed modems to establish an Internet connection using PPP through a dial-up connection into an Internet Service Provider.
- The BeOS supports the graphics circuitry on the motherboard or bundled as a PCI card with supported Macintosh and compatible computers. See the Be web site for the latest list of other supported graphics cards.
Important: This list of BeOS-ready hardware is provided for informational purposes only. Support for any particular hardware platform may change without notice. Be cannot be held responsible for the use of this information, or the appropriateness of any purchase decision based on this information.
Before You Begin
Read carefully through the following list of preliminaries before you begin installing the BeOS:
- Before you install the BeOS, be smart! Back up any Macintosh or BeOS files -- as you should do before installing any new software.
Caution: The BeOS Installer application can replace or delete existing files, or completely erase the contents of a disk before installing the BeOS. Be sure to read carefully any warning dialogs which appear during the installation process.
- If you were using Developer Release 8 of the BeOS and the BeMail application, save any messages you want to keep as text files and back them up onto another disk. You can also download a utility from the Preview Release Support section on the Be web site (
http://www.be.com/support/preview/index.html) that converts all of your Be Mail to a UNIX-style "mbox" file, which can be read by a variety of mail applications.
- If you were using Developer Release 8 of the BeOS, you do not need to back up any applications you may have installed. Applications that run under DR8 do not run under the Preview Release, and so backing them up is not necessary.
- If you were using any earlier version of the BeOS (including any version of the Advanced Access Preview Release), the final version of the Preview Release uses a revised directory structure. The standard installation will leave your old system files in place, which may lead to confusion or unpredictable behavior. You should back up all files you wish to save to another disk, and then reinitialize the disk. Alternatively, move your personal documents and important settings files to a folder named "My Stuff" and then delete all other files and folders on the disk.
If you do not have anything on the disk you wish to save, you can simply check the Clean Install option checkbox to have the Installer erase all pre-existing BeOS system folders and files, from all previous releases of the BeOS.
- If you reinstall the Preview Release of the BeOS, you may want to back up the contents of your file:///boot/home/config/settings folder, so you don't have to reconfigure your network and other settings after you reinstall the BeOS.
- Finally, read the release notes on the BeOS Installer CD-ROM and on the Preview Release Support section on the Be web site for any "gotchas" about your combination of hardware and software:
file:///BeOS Mac Tools/Release Notes
http://www.be.com/support/preview/index.html
Preparing a Power Macintosh for Installation
Before you install the BeOS, you need to install some Macintosh tools that you use to start the BeOS. These tools are on the Macintosh portion of the BeOS Install CD-ROM.
- Start the Mac OS and insert the BeOS Install CD-ROM.
- If you have earlier versions of the BeOS files for the Macintosh, delete them. In particular, delete the BeOS Mac Tools folder, its contents, and the OS Chooser extension, which is in the Extensions folder in the System Folder.
You can't use any of the files from previous releases of the BeOS with the current release.
- Open the BeOS Install CD-ROM icon (if it's not already open) and double-click the installation script named Prepare Mac for the BeOS. In the window that opens, click Install.
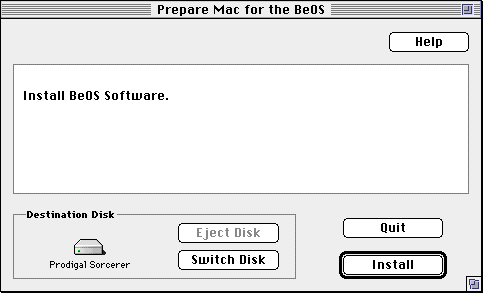
Click Continue if you're asked if it's OK to quit other applications. When the installation is complete, click Quit.
This script installs a folder named BeOS Mac Tools on the Mac hard disk. It also installs a system extension file named OS Chooser (in the Extensions folder in the System folder), which lets you choose whether you want to start the BeOS or the Mac OS each time you start the Macintosh.
Note: If you're planning to create a partition for the BeOS, rather than installing the BeOS onto an entire disk, follow the instructions in "
Advanced Installation Option: Creating a Hard Disk Partition for the BeOS For Mac OS Systems," later in this chapter. When you've created the BeOS partition, continue with these instructions.
- Open the copy of the BeOS Mac Tools folder that was installed on the Macintosh hard disk and double-click the BeOS Launcher application.
- As soon as the Be logo appears, press the left Shift key until the boot selection screen opens. Then use the keyboard arrow keys to select the BeOS Install CD-ROM and press Return.
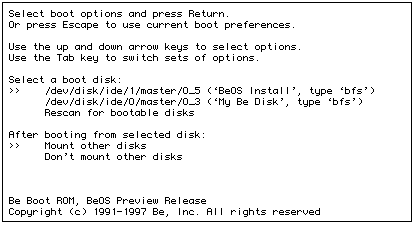
Each bootable disk is listed by its device name and by the name it has in the Tracker. The BeOS Install CD-ROM is listed as "(`BeOS Install', type `bfs')."
If the BeOS Install CD-ROM doesn't appear in the list, it's because the CD-ROM drive hasn't "spun up" and become ready yet. If this happens, use the arrow keys to select "Rescan for bootable disks" and press Return. You may need to do this a couple times if your CD-ROM drive takes a long time to spin up.
After a moment, the BeOS License Agreement panel opens.
- Read the license agreement carefully. If you accept the terms of the agreement, click Agree. If you don't accept the terms of the agreement, click Disagree, eject the CD, and return it to Be, as described in the agreement.
If you clicked Agree, the Installer application opens.
- Skip to "Installing the BeOS" to learn how to use the Installer to install the BeOS.
Preparing a BeBox for Installation
Before you install the BeOS Preview Release, you need to upgrade the BeBox boot ROM -- a portion of the BeOS system software that's stored on a chip on the BeBox motherboard.
- With the BeBox turned off, insert the Boot ROM Upgrader floppy disk in the floppy disk drive.
- Turn on the BeBox.
Messages inform you that the boot ROM chip is being upgraded. When the upgrade is complete, you're instructed to eject the floppy disk.
- Eject the floppy disk, insert the BeOS Install CD-ROM in the CD-ROM drive, and turn off the BeBox.
- Turn on the BeBox and as soon as the Be logo appears, hold down the left Shift key until the boot selection screen opens. Then use the keyboard arrow keys to select the BeOS Install CD-ROM as your boot device and press Return.

Each bootable disk is listed by its device name as well as by the name it has in the Tracker. The BeOS Install CD-ROM is listed as "(`BeOS Install', type `bfs')."
If the BeOS Install CD-ROM doesn't appear in the list, it's because the CD-ROM drive hasn't "spun up" and become ready yet. If this happens, use the arrow keys to select "Rescan for bootable disks" and press Return. You may need to do this a couple of times if your CD-ROM drive takes a long time to spin up.
After a moment, the BeOS License Agreement panel opens.
- Read the license agreement carefully. If you accept the terms of the agreement, click Agree. If you don't accept the terms of the agreement, click Disagree, eject the CD, and return it to Be, as described in the agreement.
If you clicked Agree, the Installer application opens.
- Continue with the next section, "Installing the BeOS."
Installing the BeOS
Once you've prepared a Macintosh or BeBox for installation and started up the BeOS from the BeOS Install CD-ROM, you're ready to use the Installer application to install the BeOS.
- From the Onto pop-up menu, choose the disk onto which you want to install the BeOS.

The Onto pop-up menu contains a list of hard disk drives connected to the computer. If a disk is divided into multiple partitions, each partition appears in this menu as a separate choice.
Caution: Every drive and drive partition on your computer appears in this list, including your Mac OS or DR8 partitions, if you have any. Non-BeOS volumes are noted with a volume type (e.g., "[Mac HFS]") in the pop-up menu.
- Click Begin.
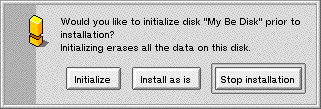
If you have selected a non-BeOS file system volume, you will see a warning dialog telling you the volume must be initialized before installation can proceed:
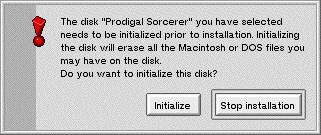
This dialog could mean that you have chosen an uninitialized partition, such as a newly created partition. In this case, the volume is empty, and it is OK to initialize it.
This dialog could also mean you have chosen a Mac OS or old BeOS partition. Be careful to select an empty or expendable partition.
If you click the Initialize button, the BeOS installs onto the volume after it is completely erased and a BeOS file system is created on it. Before this happens, you are asked to confirm the initialization and choose a volume name in step 3.
If you click the Stop installation button, the installation is cancelled, and the Installer's main screen reappears.
If the volume you have selected already has the BeOS installed on it, you're asked if you wish to replace existing files with files from the installation, or if you wish to keep your older files:
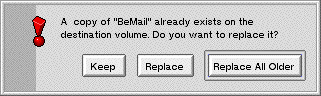
If you click the Keep button, the existing (and possibly obsolete) file will not be replaced. This dialog appears for every file which already exists on the installation volume.
If you click the Replace button, the file is replaced. This dialog appears for every file which already exists on the installation volume.
If you click the Replace All Older button, the file is replaced, and the Installer automatically replaces all remaining older files with fresh copies from the BeOS Install CD. This is the recommended selection.
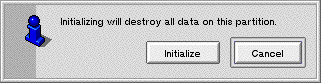
If you have selected a BeOS file system volume, you're asked if you wish to initialize the volume before installing the BeOS:
If you click the Initialize button, the BeOS installs onto the volume after it is completely erased. Before this happens, you're asked to confirm the initialization and choose a volume name in step 3.
If you click the Install as is button, the BeOS installs onto the volume without erasing anything first. Note, however, that even if you choose this option the installation process may replace files which already exist on the volume, such as the operating system files. Skip to step 4.
If you click the Stop installation button, the installation is cancelled, and the Installer's main screen reappears.
- If you have chosen to initialize the installation volume, you're asked to name the volume:

You can also set the file system block size, but unless you have a specific reason for doing so, you should not change this setting from the default of 1024.
Select the default volume name and replace it with a name for your BeOS volume, if you wish. Click the Initialize button. You're asked to confirm the initialization:
Click Initialize. The drive will be initialized (this takes a few seconds).
- The Installer begins installing the BeOS onto the hard disk or partition. The names of files appear as they are installed onto your installation volume:

If you click the Stop button, you're asked if you really wish to halt the installation:
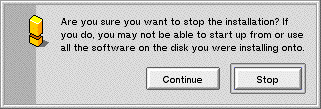
Stopping the installation is not recommended. If the Installer has removed outdated system files but not yet replaced them, your BeOS volume may not have all of the operating system files on it which are necessary to boot the BeOS from that disk. If you halt the installation process before completion, you should run a complete installation later, before you attempt to boot the BeOS from this volume.
- When the installation process is complete, you're asked if you want to use the disk or partition onto which you just installed the BeOS as the startup disk:
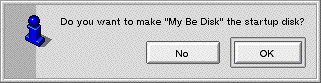
- Click OK. Or click No to leave the boot preference at the previous (or default) setting.
- Click the Quit button or the Installer window's close box to eject the BeOS Install CD-ROM and restart the computer.

If you have a Macintosh, the OS Chooser dialog box appears, shortly after you first see the message, "Welcome to Mac OS." You can use OS Chooser to select the OS you want to boot, the BeOS or the Mac OS, as described in Chapter 2, "Learning BeOS Basics."
If you have a BeBox, it restarts the BeOS.
Installation Options
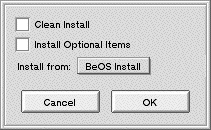
If you click the More Options button in the main Installer window, the following options dialog appears:
Start the BeOS
To start the BeOS on a BeBox, just turn it on.
To start the BeOS on a Power Macintosh, start the Mac OS and then double-click the BeOS Launcher application, which is in the BeOS Mac Tools folder you installed on the Macintosh hard disk.
To learn more about using the BeOS, see Chapter 2, "Learning BeOS Basics."
Advanced Installation Option: Creating a Hard Disk Partition
for the BeOS For Mac OS Systems
It is sometimes advantageous or necessary to create a separate partition to install the BeOS. What you need to know to do this is summarized in the following list:
Introduction
The BeOS must be installed onto its own hard drive or hard drive partition. The Mac OS also requires its own dedicated hard drive or hard drive partition. If you plan to use the BeOS on Power Macintosh or compatible hardware and have only a single hard drive in your computer, you have two choices:
This document describes how to partition your existing Mac hard drive, giving you an additional partition for the BeOS.
Warning: Partitioning your hard drive can destroy all data on that drive. Be sure you have adequate backups of all your important data before you begin any procedure in this section.
Note: If you have a BeBox, instructions for using DriveSetup to partition your hard drive can be found in Chapter 6 "
Customizing the BeOS."
Required Tools
Partitioning a hard drive requires specialized utility software, called hard drive formatting software. Some hard drive formatting utilities, such as Apple's Drive Setup, do not support creating multiple Mac OS partitions on a single hard drive. Here is a list of software we know can perform this function:
In order to partition your hard drive, you must first optimize it to move all existing data to one "end" of the hard drive, so that the formatting utility can "shrink" the existing partition without losing data. Disk optimizing utilities, such as Norton Speed Disk, do this with a minimum of effort.
Before You Begin
These are the steps to take before beginning to partition your hard drive:
- Back up the Mac hard disk.
Be smart! If you have files you can't afford to lose, back them up before partitioning the disk! We strongly recommend that you back up your entire hard drive before beginning, so that you are completely protected from accidents or software problems.
- Defragment the Mac OS disk.
There are a number of disk utilities that can defragment a disk. We've tested Speed Disk from the Norton Utilities for Macintosh. Defragmenting a disk allows you to repartition it without erasing existing files. If you don't mind erasing all the files on the disk, you don't need to defragment it.
Note: Some optimizers, including the recently released Norton Speed Disk 3.5, may separate data to both ends of your hard drive, which prevents nondestructive partition shrinking. You may need to change the default settings to get your optimizer to place all data at one end of the drive.
In Norton Speed Disk version 3.5, from the Options menu, choose Optimize For/ Disk Resizing. Previous versions of Speed Disk work automatically. Consult your software manual if you're using a different disk optimizer.
You can also defragment your hard drive by backing up the entire drive, erasing all the data, and then restoring your data from the backup. We recommend Norton Speed Disk.
- Decide how large to make the new partition.
To install the BeOS onto it, the new partition must be at least 150 megabytes in size. You may wish to make the partition larger than that, to allow extra room for files you create, or software you purchase or download from the Internet. To just try out the BeOS, 150 megabytes is fine. If you plan to use the BeOS, the partition should be 250 megabytes or larger.
Note: If you plan to shrink an existing Mac OS partition, you must have enough free space on that drive to "convert" to the new BeOS partition. If you do not have enough space, you need to delete software or data files in order to make room. If you do this, you must defragment your hard drive again.
Creating a Partition for the BeOS
Modifying your hard drive partitions is a fairly straightforward procedure. We use FWB's Hard Drive Toolkit, Personal Edition in our example because it is bundled with a number of Power Macintosh -- compatible systems. If you use a different partitioning utility, the overall sequence remains the same, although the specific steps, screens, or menu choices you need to use will likely be different. Consult your software manual for instructions on how to accomplish the steps outlined below.
WARNING: Once again, modifying hard disk partitions can destroy all data on the hard drive. Do not proceed unless you have a complete backup of your hard disk!
- Boot your computer from your Mac OS installer CD-ROM.
A bootable Mac OS CD-ROM should have come with your computer when you purchased it. If you do not have a bootable Mac OS CD-ROM, you will need to borrow one, or boot off an external disk drive. You cannot modify the partitions on a disk drive if you boot from it.
- Launch your hard disk formatting utility by double-clicking it in the Mac OS Finder.
You cannot launch your hard disk formatting utility if it is located on the hard drive you want to modify. No formatting utility can operate on a hard disk if there are files in use on that disk.
Your formatting utility may be on the Mac OS installer CD-ROM. You can also put the formatting utility onto a floppy disk, second hard drive, Zip or Jaz drive (or other cartridge drives) and use it from there.
- If your software has a splash screen, click past it. Select your hard drive in the configuration window, as shown (your software may be different):
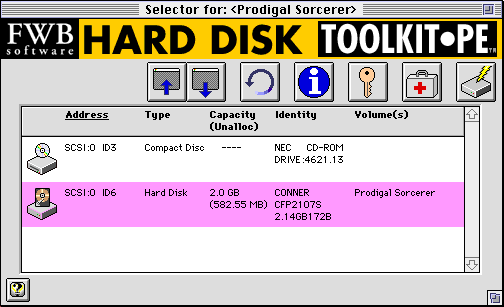
- Open the partition list or partition map window for the drive you have selected.
In Hard Disk Toolkit, you can simply double-click the disk in the window. Your software may require you to click one of the buttons, or make a selection from a menu.

- Select the existing Mac OS partition which you want to shrink.
This partition has the same name as your Mac OS disk icon in the Mac OS Finder. It is also an Apple_HFS-type partition.
- Reduce the size of the Mac OS partition by at least 150 MB.
The amount you shrink the existing volume is the same amount that you'll be able to allocate to the new partition you create.
In Hard Disk Toolkit, simply click the Resize Volume button, then choose a new (smaller) size for the existing volume (in this case, 500,000K or less):
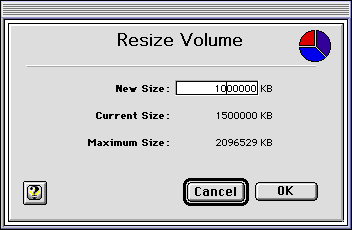
You may have to confirm the resize command, possibly several times. If you are sure you wish to proceed, confirm everything.
WARNING: This step may destroy all data on your existing Mac OS partition. Be sure you have consulted your software manual, and carefully read the alert dialogs that appear. Also be sure that this is what you want to do.
Your existing hard drive partition will be shrunk.
- Create a new, 150 MB or larger partition on the disk.
In Hard Disk Toolkit, choose the Create New Volume command from the Devices menu.
You can choose the size for the new partition (some software makes this easier than others). Most likely you'll want to make it the same size as the amount of space you shrunk the Mac OS partition.
Be sure to choose to create an Apple_HFS-type volume. You may also be able to name your volume at this point. If so, name it "My Be Disk," or any name that makes it easy to remember when you install the BeOS on it later.
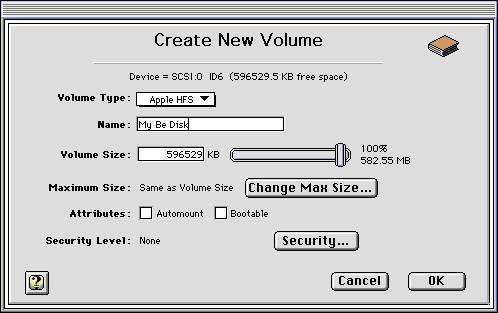
After clicking "OK" or "Confirm" to any confirmation dialogs, the hard drive partitioning utility creates a new partition on your hard drive (this can take a few minutes). When it completes, you should receive some kind of confirmation message.
- Quit your hard drive partitioning utility, and return to the Finder.
You should now see a new hard disk drive icon on your Desktop, with the name you gave your new partition. This hard drive partition is currently a Mac OS partition. When you install the BeOS onto it, the BeOS Installer converts it to a BeOS partition.
You are now ready to install the BeOS on the partition you created, as described previously in this chapter.
[Contents] [Prev] [Next] [Index]
http://www.be.com/
Copyright © 1997, Be, Incorporated. All rights
reserved.
